Wind Vane & Wind Direction
This was the most tricky of the sensors to integrate, as it does not operate in the same way as the rest of the DIY or homemade weather stations typical Wind Vanes operate, Instead, this is another I2C device.
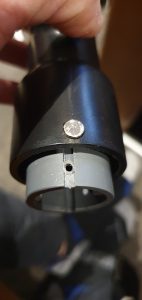
This device connects with a 6 pin JST connected and is well sealed. It also has 2 magnets on the outside which rotate around the body, making me think it was some kind of hall sensor.

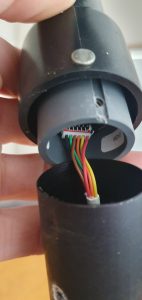
For hours I was checking for resistance, or voltage changes but could not find anything. The only reason I thought to try scan it on the I2C bus was because the wires were the same colour as the previous devices connected via I2C. So I whacked it on the I2C bus and sure enough, another device showed up.
[17:27:16][I][i2c.arduino:075]: Found i2c device at address 0x0CSome quick research returned it as a AK8975 – 3-axis magnetometer which made perfect sense, further leading me to believe I had finally figured out how to integrate this thing. A search on esphome returned no devices for “AK8975” but a search for the address “0x0c” returned a result for a MLX90393 Triple-axis Magnetometer. So I gave it a go and sure enough, it worked perfectly. So, the following code will enable wind direction readings.
  - platform: mlx90393
    address: 0x0c
    id: mlx
    x_axis
      name: "mlx_x"
      id: "mlx_x"
    y_axis:
      name: "mlx_y"
      id: "mlx_y"
    z_axis:
      name: "mlx_z"
    update_interval: 2s


  - platform: template
    id: 'wind_direction'
    name: 'Wind Direction'
    update_interval: 1s
    lambda: |-
      float w1 = id(mlx_x).state;  // magnetometer X
      float w0 = id(mlx_y).state;  // magnetometer Y
      float w = atan2(w0, w1);     // arctangent2 = radians
      w = (w * 180) / M_PI;    // radians to degrees
      w += 19.50;              // magnetic declination
      w += 68.00;              // offset
      if ( w < 0 ) w += 360.0; // adjust for negatives
      return w;
Again, I left the update interval as 1 second for real time wind direction readings.
Here, we combine the value of X and Y to determine the magnetic heading. You can adjust line
w += 68.00; // offsetUntil your magnetic readings are correct, where 68 is the offset in degrees.
The FAN
Another easy one to integrate, however this is a 3 wire fan and to be honest, I don’t know what the third wire or the signal wire of this fan does? Maybe a tachometer for reading the fan RPM? I played with it for while before just ditching it, and using a simple switch to control the fan. I did try with a PWM emulator or using the esphome LEDC integration with the fan signal, but this did nothing.
Fan is wired + to 5V and switching ground on GPIO25. A simple GPIO switch in esphome to turn the fan on or off.
switch:
  - platform: gpio
    pin: 25
    name: "Fan"
    inverted: True

