
Part 3 – Starting the Services
Now we are ready to manually launch the delta5 server. We want to manually launch the service to see if there are any errors printed out or any nodes not being detected. We will do some additional configuration changes such as editing the admin username and password, and changing the default web server port.
First, lets make sure the delta5 service is not running from the previous service created in systemctl.
sudo systemctl stop rotorhazard.serviceNow, lets navigate to the server directory and manually launch the delta5 server.
cd /RotorHazard/src/serverNow start the delta5 service.
sudo python server.pyIf all went well, we should see the following printout with no errors.
pi@raspberrypi:~/RotorHazard/src/server$ sudo python server.py
Configuration file imported
Node 1 found at address 8
Node 2 found at address 10
Node 3 found at address 12
Node 4 found at address 14
No node at address 16
No node at address 18
No node at address 20
No node at address 22
Node 1: API_level=18, Freq=5843, EnterAt=200, ExitAt=186
Node 2: API_level=18, Freq=5695, EnterAt=200, ExitAt=150
Node 3: API_level=18, Freq=5732, EnterAt=252, ExitAt=185
Node 4: API_level=18, Freq=5769, EnterAt=200, ExitAt=116
Language file imported
LED: hardware GPIO enabled
Number of nodes found: 4
Release: 2.0.1 / Server API: 23 / Latest Node API: 18
Found installed:  openjdk version "11.0.3" 2019-04-16
Found installed:  IMDTabler Version 1.3
Database current laps reset
Set Profile to '1'
Running http server at port 80
Changing HTTP Port and Password
From the src/server directory copy config-dist.json to config.json
cd RotorHazard/src/server
sudo cp config-dist.json config.json
Copy the original config-dist.json to a new file, config.json. Dont rename the config-dist.json. This means if we make mistakes in the config.json file when editing, we can just delete it and copy a new one from the original config-dist.json.
Now edit the file
sudo nano config.json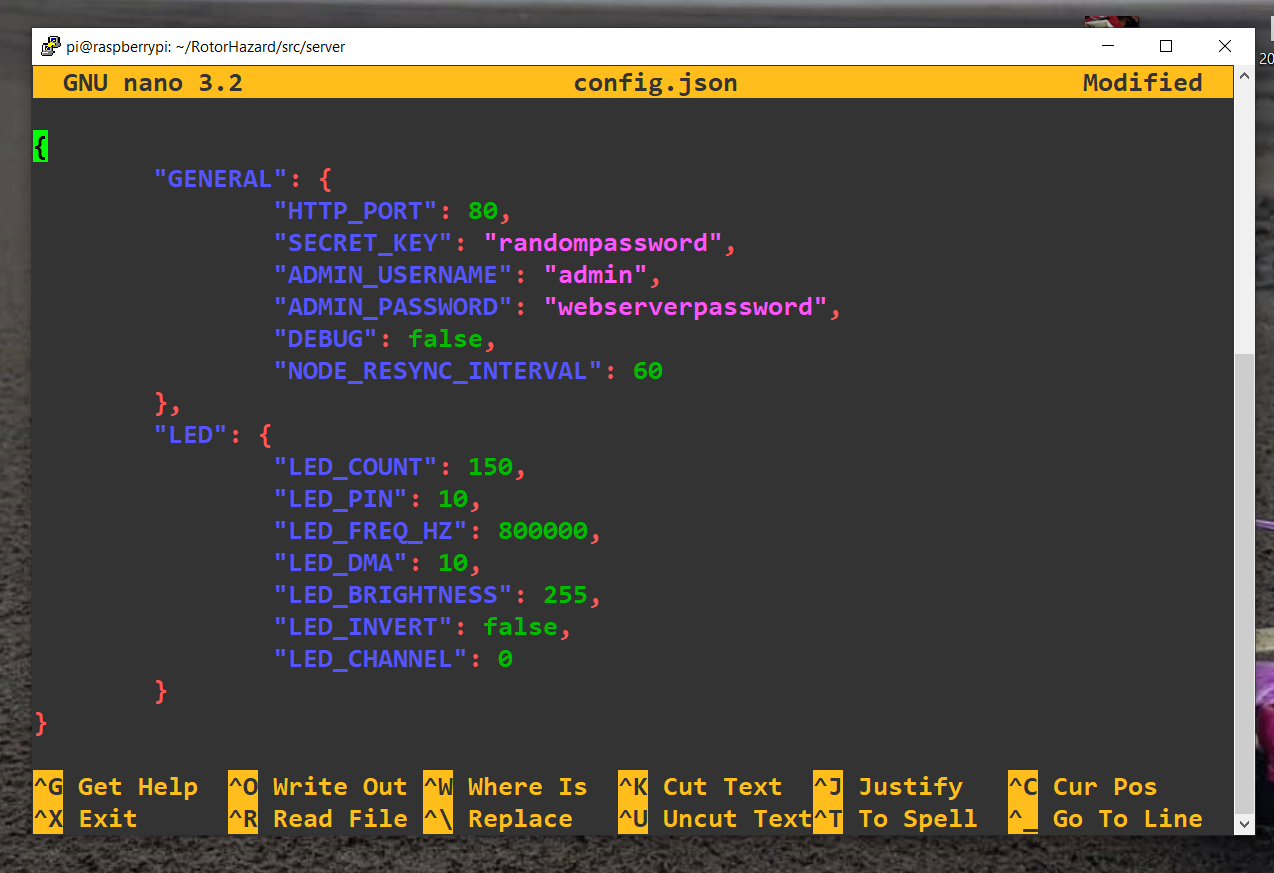
You will see the following code, scroll down to the #General section and change the following values to your preference. Using port 80 for the HTTP_PORT will not require a port number to be defined when connecting with your web browser. Be sure to change only the values shown in BOLD below, removing any a single entry of syntax will cause issues.
"HTTP_PORT": 5000,
"SECRET_KEY": "secret!",
"ADMIN_USERNAME": "admin",
"ADMIN_PASSWORD": "rotorhazard",
Now hit ctrl+x and type Y to save.
Reboot the timer.
sudo rebootTroubleshooting
Some common issues you may run into are missing packages or database issues. If you have issues starting the delta5server, I suggest you try deleting the database file first, database.db in the server directory. To do this, make sure you are in the server directory.
cd /RotorHazard/src/serversudo rm database.dbThen try restart the service. Additional common errors relate to the I2C baud rate being too high. If you are getting [Errno 121] Remote I/O Errors, this is most likely the cause. You need to change the baud rate of the I2C bus. To do this, edit your boot config
sudo nano /boot/config.txtand add
dtparam=i2c_baudrate=75000This will force the I2C bus to run at a baud of 75000.
Lastly, if you are getting errors relating to the Neopixel libraries being incompatible or something along those lines (cant remember the exact error), then follow the steps below.
sudo apt-get install python-dev git scons swigcd ~
git clone https://github.com/jgarff/rpi_ws281x.gitcd rpi_ws281x
sudo sconscd python
sudo python3 setup.py buildsudo python3 setup.py installNow try launching the server again.
cd ~
cd RotorHazard/src/server
sudo python server.py
If you are having issues with HostAPD not broadcasting the racetimer SSID, this could be to do with the wpa_supplicant. If there is a wpa_supplicant for the interface you are trying to use with HostAPD in AP mode, the wpa_supplicant will prevent HostAPD from starting and will not allow the SSID to be broadcast. Lets say for example you are using WLAN0 as your HostAPD interface then you want to make sure you do not have a wpa_supplicant.conf in your /etc/wpa_supplicant folder. Lets take the wpa_supplicant.conf and move it to wpa_supplicant-wlan1.conf, or if there is a wpa_supplicant-wlan0.conf, again move it to wpa_supplicant-wlan1.conf.
cd /etc/wpa_supplicant
sudo mv wpa_supplicant.conf wpa_supplicant-wlan1.conf
or
sudo mv wpa_supplicant-wlan0.conf wpa_supplicant-wlan1.conf
This now means we have no wpa_supplicant.conf running on interface wlan0. We have moved the wpa_supplicant.conf to run specifically on wlan1, so if you insert a USB WiFi dongle it will appear as WLAN1 and will follow the wpa_supplicant-wlan1.conf file. This means you can edit this file to connect to your WiFi network, using another wireless interface. Now, HostAPD services will start and be able to use WLAN0 to broadcast on.
Updating the Timer
Follow the steps below to update the timer when newer releases are available. We need to find the latest version of the RotorHazard fork and replace the version in the text below before cloning. Where 2.0.1 marks the current version, visit the RotorHazard latest releases page for more information on the latest release and replace 2.0.0 with the version you want to clone. In this case we use 2.1.0-beta1, the latest version at the time this article is updated. For example
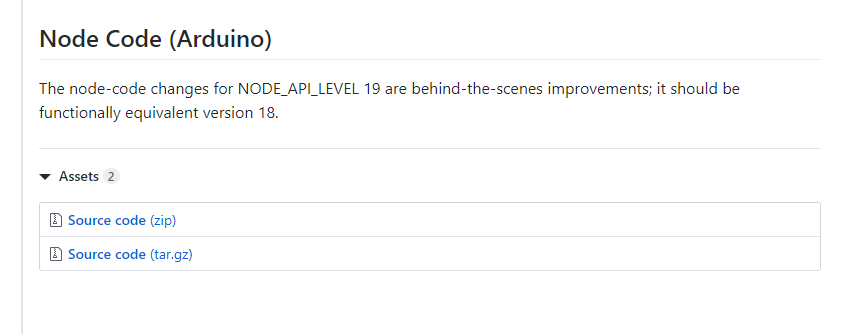
Navigate to the Assets section of the release page on github of the version you want to update to. Right click on Source Code (zip) and click copy link and replace the link with the link below, after wget and before the -o.
wget https://codeload.github.com/RotorHazard/RotorHazard/zip/2.1.0-beta.1 -O temp.zipcd ~
wget https://codeload.github.com/RotorHazard/RotorHazard/zip/2.1.0-beta.1 -O temp.zip
unzip temp.zip
mv RotorHazard RotorHazard.old
mv RotorHazard-2.1.0-beta.1 RotorHazard
rm temp.zip
cp RotorHazard.old/src/server/config.json RotorHazard/src/server
cp RotorHazard.old/src/server/database.db RotorHazard/src/serverAbove, we copy the old configuration file config.json to the new RotorHazard directoy, we also copy the database.db to the new directory so that all user settings and your database is restored.
Lastly, we now need to update any dependencies that may have changed. Again, we do this by using the requirements.txt file, which would have any been downloaded in the update, and will contain any new packages or additional packages to install.
cd ~/RotorHazard/src/server
sudo pip install --upgrade --no-cache-dir -r requirements.txt
Now, we start the RotorHazard service.
cd RotorHazard/src/server
sudo python server.py

OR

sudo systemctl rotorhazard start
Please refer to the RotorHazard GitHub page to see if the NANO code is required to be updated. Remember, the server is not the only thing that needs updating, the NODES may require new code to be flashed too!
Links & References
Original delta5 code written by Scott Chin on github
RotorHazard Delta5 Fork on github
Additional Hostapd Configuration
Ready to flash Image!
Below is a image I have created which is pre-configured with the latest version of RotorHazard timer software and is also running the hostapd WiFi hotspot. This is a clean image with no errors so assuming you have all hardware setup correctly, you can flash this image to your PI SD card and just boot the race timer! Connect to it via WiFi, and browse to the IP with your web browser.
Firstly, download and install Win32 Disk Imager.
Now, before running win32, insert a blank SD Card into your computer. Now launch win32 Disk Imager. Here we are flashing a pre-build rotorhazard image, however this is the same process to flash the stock buster image.
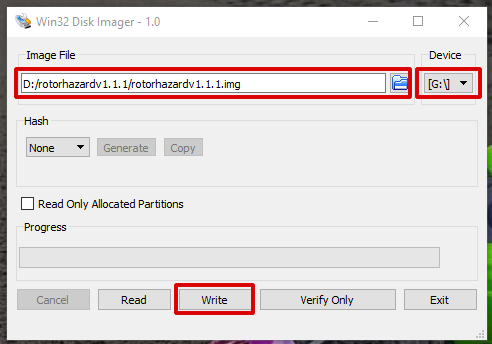
Now, select the downloaded and extracted .img file to be flashed. Also select the path of your MicroSD card, be sure to get this right! Now hit write. This will write the image to the SD and when complete, you can just throw the SD into the PI and boot!
Pre-Build RotorHazard Image (Ready To Flash)
RotorHazard v2.1.0 Beta 1 Race Timer IMG – Updated 29.12.19 Version 2.1.0
RotorHazard v2.1.1 Stable.IMG – Updated 12.04.20 Version 2.1.1
RotorHazard v2.2.0 Stable.IMG – Updated 04.07.20 Version 2.2.0
RotorHazard v2.3.2 Stable.IMG – Updated 12.02.21 Version 2.3.2
RotorHazard v3.0.0 Stable.IMG – Updated 15.09.21 Version 3.0.0
Please note to use the pre-built images you must use a 16GB SD Card or above.
To run OTA updater (Version 2.3.2 and above).
cd ~
cd RH-ota
sudo python3 start_ota.pyImage Details (Advanced Users):
SSH Enabled
I2C Enabled
SPI Enabled
Added WS2812b LED Support
Added INA219 Voltage/Current Support
Added BME280 Temperature Support
Added Java
Included OTA Updater
Hostapd configured for wlan0 only - No internet access on this interface.
eth0 on DHCP and for Internet access and downloading updates etc.
Default Usernames and Passwords:
SSID: racetimer
Password: rotorhazard
Static IP: 192.168.10.1

Web Login:
Username: admin
Password: rotorhazard
Web server port: 80

Raspbian SU Login (default):
Username: pi
Password: rotorhazard
(I suggest changing this, if you have others connect to the timer as you have SSH enabled. Type passwd in CLI.)
Hostname: raspberrypi

Share Name: \\192.168.10.1\rotorhazard
Username: pi
Password: rotorhazard (Suggest Changing)

In version 2.1.1 I have made some changes to the image. There are two interfaces, WLAN0 and WLAN1.

WLAN0 is configured for internet access as a client interface with DHCP enabled. WLAN1 is configuration as a AP with SSID racetimer. You need to enable WLAN0 in order to update the timer and to get internet access. If you do not have two wireless interfaces some changes will need to be made.I have also added SAMBA in the latest release 2.1.1. This allows you to map a drive and browse the contents of the rotorhazard directory.

Version 2.1.1 also includes the latest stable release of RotorHazard OTH for over the air flashing of nodes.
2.1.0 MD5 Hash: b37c77c4a423c9421a655e99456cdc63
2.1.1 MD5 Hash: 114a6e197fbe9f5423b60dcad37bf5fc
2.2.0 MD5 Hash: 1a48852b830431b99f8a308c31f2e53a
2.3.2 MD5 Hash: 33a49e717a65e7418ea6327446632de6
3.0.0 MD5 Hash: a31bd85b427f29e0849e47216759131a


All Comments
Awesome bro
Awesome article about the racetimer, but username and password dont work and the Admin login is also missing.
Could you please be so kind and share those information with us.
Hey man. The admin login for the web server didnt work? Should be admin and password as rotorhazard. Are you able to browse to the web server?
Yeah, that work. Thank man
Thank you for the guide and the pre-built image. Made it super quick to switch over from Delta5!
Great, glad it helped you. Stay tuned for new releases of RotorHazard, there are some cool upcoming features including split timing!
I flashed the 2.1.1 .img, but I don’t see the AP, how can I enable the AP to get the SSID to show up?
Thanks,
Hi Quy, the easiest way to do this is to plug in a second USB wifi dongle. You should then get your SSID show. If you do not have one, do the following after connecting your timer to your router via Ethernet. This is because the WiFi AP is assigned to WLAN1 but the default wifi interface built into the PI is on WLAN0. Here we need to reassign the AP and DHCP server to use WLAN0 instead of WLAN1.
1. run sudo mv wpa_supplicant-wlan0.conf wpa_supplicant-wlan1.conf
2. sudo nano /etc/dhcpcd.conf
Find the following line and replace wlan1 with wlan0
interface wlan1 – Replace with wlan0
static ip_address=192.168.10.1/24
static routers=192.168.10.1
static domain_name_servers=192.168.10.1 8.8.8.8
3. sudo nano /etc/dnsmasq.conf
replace interface=wlan1 with interface=wlan0 – Hit ctrl x and y to save.
4. sudo nano /etc/hostapd/hostapd.conf
replace interface=wlan1 with interface=wlan0 – Hit ctrl x and y to save.
5. sudo reboot
You should now see the ‘racetimer’ SSID broadcast.
Hi Dean,
So I got it figured out with some ‘googling” … LOL
So I reimaged the SD card again to be sure to start fresh and when I ssh to the PI, I noticed a message saying WLan0 was disabled by rfkill, so I entered the following command:
ifconfig – (I was not able to see the WLan0 interface)
I then did the commands:
sudo rfkill unblock 0
sudo reboot
once I made a ssh connection again, I tried:
ifconfig – (I was now able to see the WLan0 interface)
I went back through your instructions, but for the wpa_supplicant-wlan0.conf .. this was located in /etc/wpa_supplicant/ folder correct?
I’m now able to see the “racetimer” SSID
Thanks.
Hi Dean,
Thanks for the instructions, unfortunately it didn’t work for me or I may have missed something.
First off, I’m not a linux expert by any means, but when I do the “ifconfig” command I don’t see the Wlan0 interface. Is this why the commands you provided did not work?
I tried another image 2.0.1 and was able to get the Wlan0, so is the 2.1.1 img missing something?
Thanks.
Yes, you should be seeing a wlan0 or a wlan1 interface. If you don’t see any interfaces this would mean that your wlan interface is either faulty, or down. To bring the interface up you could try
sudo ifconfig wlan0 up
i figured it out in the comment above… thanks.
No worries. Glad you got it sorted.
When i download image 2.1.1 the .rar file does not open. It gives me a message saying this file is not an archive.
Nevermind, seems my rar software is corrupt.
Glad you got it sorted.
hey thanks for the hard work .im having a hard time trying to boot from the compiled image.
the normal raspberry buster works but lots of the commands come back as fails and the compiled sd card 2.1.1 dosent boot and show on putty at all. ive been at this all day and im at a loose end now . is there a problem with the stable img? should i be doing something different than the normal boot version.. please help man . cheers . Nick
Hi Nick! I’ve updated the image. Could you try downloading again and flashing the new image and see if the SSID is broadcast as “racetimer”. I have moved the wpa_supplicant to wpa_supplicant-wlan1.conf so if you need internet access, you either need to use Ethernet or insert a USB wifi dongle and edit the wpa_supplicant-wlan1.conf in /etc/wpa_supplicant to your wifi details.
Cheers
hey Dean
Awesome ill try that again and let you know.
i got the buster one to almnost complete after 10 hours the other day lol but now plugging it back in i get this looping constantly “Raspbian GNU/Linux 10 raspberrypi ttyS0” so ive just formatted sd and started again.
Sweet, if you’re having consistent boot issues its almost 99% of the time a bad SD card. Try a different SD card!
Its weird as the sd is fine for the buster image. its writing the image now .did you change it to the 2.1 beta image as that is what its downloading as now? cheers
hey dean its booted from sd card but its maybe something I did loading all the files on the buster img.but im getting this login loop constantly
▒▒▒▒▒▒▒▒▒▒▒▒▒▒▒▒▒▒▒▒▒▒▒▒▒▒▒▒▒▒▒▒▒▒▒▒▒▒▒▒▒▒▒▒▒▒▒ ▒▒▒ѥ▒▒Ɂlogin:
Raspbian GNU/Linux 10 racetimer ttyS0
god this is not my forte lol .
Yup, boot loops and hangs are generally SD cards! Especially if its a fresh install.
ok ill try another one. its showing in my wifi though as racetimer so something is working . thanks man
[ 16.256020] i2c /dev entries driver
racetimer login:
Raspbian GNU/Linux 10 racetimer ttyS0
▒▒▒▒▒▒▒▒▒▒▒▒▒▒▒▒▒▒▒▒▒▒▒▒▒▒▒▒▒▒▒▒▒▒▒▒▒▒▒▒▒▒▒▒▒▒▒▒▒▒ѥ▒▒Ɂlogin:
Raspbian GNU/Linux 10 racetimer ttyS0
▒▒▒▒▒▒▒▒▒▒▒▒▒▒▒▒▒▒▒▒▒▒▒▒▒▒▒▒▒▒▒▒▒▒▒▒▒▒▒▒▒▒▒▒▒▒▒▒▒▒ѥ▒▒Ɂlogin:
Raspbian GNU/Linux 10 racetimer ttyS0
▒▒▒▒▒▒▒▒▒▒▒▒▒▒▒▒▒▒▒▒▒▒▒▒▒▒▒▒▒▒▒▒▒▒▒▒▒▒▒▒▒▒▒▒▒▒▒▒▒▒▒ѥ▒▒Ɂlogin:
Raspbian GNU/Linux 10 racetimer ttyS0
▒▒▒▒▒▒▒▒▒▒▒▒▒▒▒▒▒▒▒▒▒▒▒▒▒▒▒▒▒▒▒▒▒▒▒▒▒▒▒▒▒▒▒▒▒▒▒@▒▒▒ѥ▒▒Ɂlogin:
Raspbian GNU/Linux 10 racetimer ttyS0
▒▒▒▒▒▒▒▒▒▒▒▒▒▒▒▒▒▒▒▒▒▒▒▒▒▒▒▒▒▒▒▒▒▒▒▒▒▒▒▒▒▒▒▒▒▒▒▒▒▒▒ѥ▒▒Ɂlogin:
Raspbian GNU/Linux 10 racetimer ttyS0
4-fs error (device mmcblk0p2): ext4_lookup:1590: inode #21315: comm systemd: ige t: bad extra_isize 65535 (inode size 256)
[ 179.958102] EXT4-fs error (device mmcblk0p2): ext4_lookup:1590: inode #2065: comm rs:main Q:Reg: iget: bad extra_isize 65535 (inode size 256)
[ 179.988175] EXT4-fs error (device mmcblk0p2): ext4_lookup:1590: inode #21315: comm systemd: iget: bad extra_isize 65535 (inode size 256)
Raspbian GNU/Linux 10 racetimer ttyS0
▒▒▒▒▒▒▒▒▒▒▒▒▒▒▒▒▒▒▒▒▒▒▒▒▒▒▒▒▒▒▒▒▒▒▒▒▒▒▒▒▒▒▒▒▒▒▒▒▒▒▒ѥ▒▒Ɂlogin:
Raspbian GNU/Linux 10 racetimer ttyS0
▒▒▒▒▒▒▒▒▒▒▒▒▒▒▒▒▒▒▒▒▒▒▒▒▒▒▒▒▒▒▒▒▒▒▒▒▒▒▒▒▒▒▒▒▒▒▒▒▒▒▒ѥ▒▒Ɂlogin:
Raspbian GNU/Linux 10 racetimer ttyS0
so ive tried another sd card and the same happens .with the additional error lines now and then.
I haven’t got any nodes connected as I haven’t finished the build yet but im sure that’s not the problem .thanks for any help you can give me .
Very weird. How are you powering your pi? What is the current output?
its off the usb from pc .all working ok now im just triyng to update everything manually to the latest version from the 2.0.1 bad wifi connection is not fun with all this though :{
Cool. Yea I would recommend Ethernet
Hi Dean hope your’e well man ..Everything is working great with this timer ive got the external antenna installed and can connect over Ethernet too if i need to but im really struggling getting a wifi dongle working! Ive purchased one that is regocnised and is showing in ifconfig in wlan1 and i think the firmware is loaded ok but its the registering it on my network im having trouble with.. in the /etc/wpa_supplicant/wpa_supplicant.conf folder its empty and if i add credentials in there nothing happens .aloso same with /etc/wpa_supplicant/wpa_supplicant-wlan1.conf folder. I added stuff to the interfaces folder but then my ssh stopped working and i had to dig out the usb serial one again lol ..please help brother ,your’e much better at this than me .. cheers
Hi Nick
Can you post your WPA supplicant.
Also, is the wifi dongle acting as a client? And if so make sure the network you are connecting to is offering DHCP.
Thanks Dean, haven’t had chance to look recently but I had an idea to connect to my android phone via USB.. I cannot connect to it via ethernet as my phone doesn’t seem to pick it up using a ethernet to USB dongle. So I’ve managed to get the command line to connect to the broadcast ip using a USB cable and would like to know if I could adjust the broadcast of race timer to run out through the ip of the USB? Is this possible? Would be so much easier that way and I could get a 10m cable and have solid connection just unsung my phone.. Thanks for any help dude
Can you elaborate a little more. Are you trying to use an external AP connected via Ethernet?
Hi thanks for the guide! I used the image provided for 2.1.1 on a pi 3B+
The AP seems to be running out of the box, but the dnsmasq service fails to start.
The AP shows up and I can connect, but it just sits there “obtaining Ip address” and does nothing.
Any ideas? Reflash?
Also, just noticed the link to the 2.1.1 file is the same as the 2.1.0 beta 1…
Is there a link to the 2.1.1 image?
Many thanks!
Hey Jaemie.
Sorry the link is
https://mega.nz/file/77oSCAQa#dS9icw8gu9WxiH7Vo4kAIgMjwX1FcsmbRaCOHXX1iL0
Cheers.
Thanks Dean!
Pending this flash I have some RSSI issues. Is there a way I can chat or talk this issue through? I’m happy to pay for the help!
I’m in Australia if timezones are an issue.
You can throw your adapter on a static address on the 192.168.10.0/24 network.
Set a static IP on the adapter and your computer.
IP: 192.168.10.100
Mask: 255.255.255.0
No gateway or DNS
Try connect again and you should be able to ping or SSH 192.168.10.1.
Now you can check the issue with DNSMasq once connected.
I’m getting this error now…
● hostapd.service – Advanced IEEE 802.11 AP and IEEE 802.1X/WPA/WPA2/EAP Authenticator
Loaded: loaded (/lib/systemd/system/hostapd.service; enabled; vendor preset: enabled)
Active: activating (auto-restart) (Result: exit-code) since Mon 2020-05-25 06:32:14 BST; 879ms ago
Process: 774 ExecStart=/usr/sbin/hostapd -B -P /run/hostapd.pid -B $DAEMON_OPTS ${DAEMON_CONF} (code=exited, status=1/FAILURE)
why attached a wifi antenna before powering? without this mod there is also a open circruit and we powering it up where is the diffrent?
Sorry I dont understand your question. Cheers
When I start a race the laps aren’t being recorded. Sensor tuning seems good. Any ideas?
Make sure you are getting RSSI readouts on the tuning graph. Also make sure the peaks go above your enter at RSSI.